
Blue Teams Hate This One Trick - Bypass Endpoint Defenses for Reverse Shell Execution on Hardened Hosts
Author: Richard Whitcroft, Principal Security Specialist (OSCE3, CRT)
What Is This?
This is the story of getting shellcode execution and a reverse shell on a hardened host in a well-managed (and well-funded) network.
Note that this was primarily an opportunity for me to apply the various techniques I’ve learned from the courses I’ve taken recently. The process described here is somewhat contrived, and getting a shell when you already have desktop access is not especially useful, but hopefully there should still be some takeaways if this is a topic that interests you.
Environment
The target host is a fully patched Windows 10 workstation with Carbon Black and Cortex XDR.
Carbon Black: Aggressive software restriction - prevents execution of unknown executables, including DLLs, VB/JS scripts, and drivers. PowerShell is allowed since it is part of the Windows base system, but see below.
Cortex XDR: Sophisticated endpoint protection, very effective at detecting and blocking threats.
Carbon Black Kernel Driver
Carbon Black’s kernel driver (cbk7.sys), which is loaded at boot time, is able to inspect process creation by calling the PsSetCreateProcessNotifyRoutine() Windows API. From MSDN:
“The PsSetCreateProcessNotifyRoutine routine adds a driver-supplied callback routine to, or removes it from, a list of routines to be called whenever a process is created or deleted.”
To monitor thread creation and image loads, it calls two more similar functions: PsSetCreateThreadNotifyRoutine() and PsSetLoadImageNotifyRoutine(). (An “image” in this context just means a DLL.)
When the callback function receives a notification, it performs several checks to determine whether it should allow or block the request. Non-allowlisted executables and DLLs will always be blocked.
Approach
The goal is to run arbitrary code on the host to get a reverse shell. Since custom executables, DLLs, and scripts are blocked by Carbon Black, we can try injecting code into an existing process, or one that we’re allowed to launch such as notepad since it’s a Windows base application. This method is sometimes called “fork & run” where a process is started whose only purpose is to receive an injection of code.
This technique has been known for years and usually consists of the following steps:
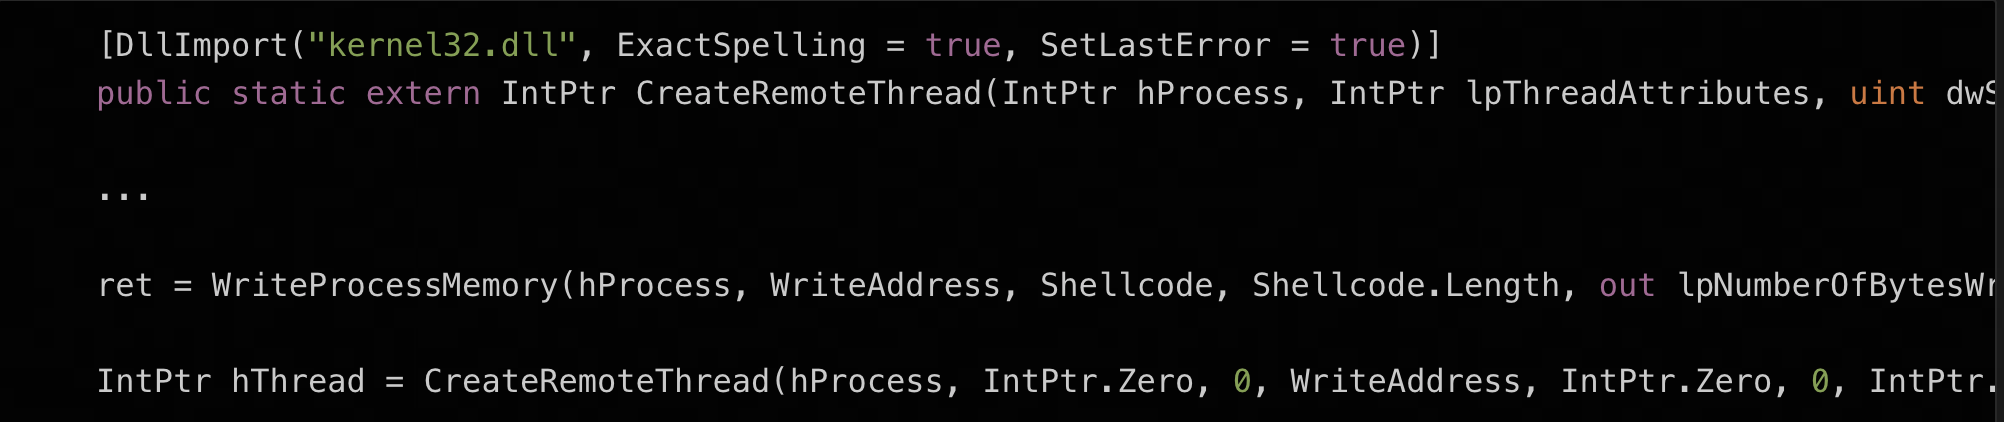
OpenProcess()to get a handle to the target process.VirtualAllocEx()to allocate a read-write-execute buffer in the target process.WriteProcessMemory()to write the shellcode into the newly allocated buffer in the target process.CreateRemoteThread()to create a thread in the target process whose entrypoint is the shellcode buffer.
Because this technique is so well-known, nearly all AV/EDR products will closely monitor these functions using hooks. Calling these four functions in sequence will usually result in a detection, so it’s better to find different ways to achieve the same outcome. As we’ll see, obtaining a reverse shell under Carbon Black and Cortex XDR was possible using only two of the four functions above (OpenProcess() and WriteProcessMemory()).
PowerShell
PowerShell is fairly simple and does not require compilation or any extra tools, so it’s the obvious first choice. The general approach with PowerShell is to import Windows API functions using the Add-Type cmdlet, then call them as usual from within PowerShell.

Importing and calling Windows API functions in PowerShell
While Carbon Black generally leaves PowerShell alone because it is an allowlisted application, Cortex does not. In fact, the moment the Add-Type cmdlet is executed with the DllImport directive, Cortex kills the PowerShell process. It may be possible to obfuscate the Add-Type arguments, but this seems like a losing battle.
I did try disabling AMSI, but my guess is Cortex is using its own inspection engine and not relying on AMSI, which is probably a good decision since AMSI is notoriously easy to disable. See https://amsi.fail.
The Story So Far
We can’t run exes. We can’t load DLLs. We can’t use VBScript or JScript. We can’t use PowerShell to import Windows functions. Fortunately, there is one avenue left to explore that may allow us import and call the Windows APIs above needed to run shellcode.
InstallUtil
InstallUtil is a Windows base application that is used for installing and uninstalling software. Its only functionality we’re interested in is its /u option which is used to uninstall applications.
When applications are built in C#, developers have the ability to add in two special functions: Install() and Uninstall(). These functions are never called internally, but instead are used to perform any initialization needed when installing, and any cleanup needed when uninstalling. We will focus on Uninstall() because it does not require administrator privileges.
We are of course not concerned with actually uninstalling anything - the only reason this is useful is because it should let us run arbitrary C# code to perform the process injection. Even though we can’t run our exe directly, we can still put code in the Uninstall() function and then use installutil /u myapp.exe to force Windows to call it for us, bypassing Carbon Black’s restrictions.
PoC #1

PoC that successfully launches notepad.exe
When we build this app (now known as iu.exe), upload it to the target system, then do installutil /u iu.exe, we see a new instance of notepad.exe pop up, proving that the Uninstall() function was executed. We can now build on this PoC to try injecting code into notepad.exe.
An Alternative to VirtualAllocEx()

Code injection will always require a memory buffer in the target process that is marked as executable. This is achieved either by passing the PAGE_EXECUTE_READWRITE constant to VirtualAllocEx() at allocation time, or by calling VirtualProtect() (with the same constant) to change the permissions on an existing memory region. Ideally, we don’t want to do either of these things, because allocating memory marked as executable is a red flag to EDR.
We’ll give Cortex its due credit by not even attempting the traditional steps described in the previous section. Instead, we’ll use Windbg to examine the memory regions in the notepad.exe process (the injection target).

Output of the Windbg !address command (edited for brevity)
In the output above we can see that one of the memory regions is marked as PAGE_EXECUTE_READ. This means that data in this region can be treated as instructions executed by the CPU, whereas regions without this protection cannot. In fact, this is the .text section, where all of the application’s actual code is stored, so of course it must be executable. If we can manage to write our shellcode somewhere in this region, we can move on to worrying about how to execute it.
WriteProcessMemory()

You may have noticed that the region’s protection is PAGE_EXECUTE_READ instead of PAGE_EXECUTE_READWRITE, so how are we going to write to it? Not to worry - an undocumented feature of WriteProcessMemory() is that it ignores protection flags and will write to memory that is not marked as writable.
From MSDN: “WriteProcessMemory() copies the data from the specified buffer in the current process to the address range of the specified process. Any process that has a handle with PROCESS_VM_WRITE and PROCESS_VM_OPERATION access to the process to be written to can call the function.”

Partial list of memory protection constants
According to this documentation, we need to have a handle to the process which has the PROCESS_VM_WRITE (0x20) and PROCESS_VM_OPERATION (0x8) flags. When these are bitwise-OR’d together, we get 0x28, which is what we’ll pass to the call to OpenProcess() as the dwDesiredAccess parameter. For reference, the function signature of OpenProcess() looks like this:

Code Cave
The plan so far is to call OpenProcess() to get a handle to the notepad.exe process, then call WriteProcessMemory() to write shellcode somewhere in the RX region described above. But where exactly?
When the compiler builds an .exe, it allocates the memory regions in chunks. This means that most of the time there will be an area at the end of the region that is empty and is the perfect place to store code without clobbering any existing functions/instructions which may crash the application. This is known as a “code cave”.
According to the output of !address above, the region we’re interested in ends at address 0x7ff7e7f46000, so let’s examine the memory just before the ending address. We can start by examining the memory 2048 bytes before the end of the region:

Displaying the area of memory before the end boundary
Not surprisingly, the last 0x800 (2048) bytes in this region are empty, so we could potentially write our shellcode anywhere in this area without clobbering existing code.
Just for demonstration purposes, if we go back even further, we’ll run into some of Notepad’s actual live code, so this is too far back (unless we don’t mind clobbering existing code which is also an option):

Displaying memory containing live code
This is not a problem since 2048 bytes is plenty of space for most shellcode. We know we can write starting at 0x800 bytes before the end of the RX region (our code cave), so can we just hardcode that address in our call to WriteProcessMemory()? Of course not!
Dealing with ASLR
From Wikipedia: “Address space layout randomization (ASLR) is a computer security technique involved in preventing exploitation of memory corruption vulnerabilities. In order to prevent an attacker from reliably redirecting code execution to, for example, a particular exploited function in memory, ASLR randomly arranges the address space positions of key data areas of a process, including the base of the executable and the positions of the stack, heap and libraries.”
Every time Windows boots, ASLR randomizes the base addresses of modules, so we need to deal with bases and offsets instead of absolute addresses. Knowing the offset of 0x800 from the end of the region is a good start; we just need to know the base address of the process.
Conveniently, C# allows us to retrieve the base address of the notepad.exe process:

We just need to calculate the offset from the base address of notepad.exe to 0x800 bytes before the end of the RX region, so:

Now with the base and the offset, we can calculate the absolute address of the code cave with:

PoC #2
Now that we can dynamically calculate the absolute address to write our shellcode to, we’ll update the Uninstall() function to import the required functions and then call them. We won’t get greedy yet by trying to call CreateRemoteThread() - it’s better to make small incremental changes to more easily figure out what went wrong or what got detected/blocked.

Now rebuild, upload iu.exe to the target system, and installutil /u iu.exe to trigger Uninstall(), and we get no alerts from Cortex. It seems we can write our shellcode to the code cave inside notepad.exe. As a reminder, writing directly to memory already marked as executable saves us from having to allocate RX memory ourselves with VirtualAllocEx(), which is risky.
Note: We’re storing the shellcode in a file on disk, which is not ideal. The reason I did this is because it saves having to rebuild and re-upload iu.exe if the shellcode embedded inside it changes. And since Cortex wasn’t detecting the shellcode file on disk, it’s not a big deal (it’s just MessageBox shellcode at this point).
With our shellcode where we want it, we can now try to introduce and call CreateRemoteThread() to execute it.
CreateRemoteThread

We make two small updates to the C# code:
Rebuild, re-upload, run. And…

Oh no! Cortex does not like the call to CreateRemoteThread(). This means that putting our shellcode in a code cave won’t work because we have no way of redirecting execution to that address, since our plan was to use CreateRemoteThread() and pass it an entrypoint pointing at the code cave.
The Story So Far
We had our shellcode in a code cave at a known address (base plus offset), but when we tried to CreateRemoteThread() to execute it, Cortex became uncomfortable and killed our Notepad process. Creating a separate thread inside Notepad to run the shellcode is nice because it has the benefit of keeping Notepad alive and responsive, but is actually not necessary. After all, Notepad is a sacrificial process in this scenario, so as long as our shellcode runs, we don’t really care if Notepad crashes afterward.
An Alternative to CreateRemoteThread()
Instead of creating a thread to execute our shellcode, we can try to use Notepad’s UI functionality to make it call a specific function. For example, let’s pretend there’s a ShowAbout() function inside Notepad that gets called when the user clicks Help -> About Notepad. We could modify our C# code to write our shellcode at the address of ShowAbout(), completely clobbering the function’s instructions, then click on Help -> About Notepad to trigger the call to this function where our shellcode is waiting to be executed.
While there is nothing quite as obvious as ShowHelp(), we can use IDA to look for a function whose name could give a hint as to when it will be called:

IDA displaying Notepad's functions
It is reasonable to assume that ReplaceSel() might mean “replace selection”, which could be triggered when the user hits CTRL-H to do a text search/replace. We can test this assumption by setting a breakpoint on notepad!ReplaceSel in Windbg and then doing a search/replace:

Windbg breakpoint on ReplaceSel()
Confirmed - we can force a call to ReplaceSel() by hitting the Replace button in the Replace dialog. This allows us to redirect execution to an address we can calculate at runtime (base plus offset) without ever having to call CreateRemoteThread(). Looking at the table of functions above, we can see that IDA shows ReplaceSel()’s address as 0x00000001400157a8. Note that because IDA does not (cannot) take ASLR into consideration, it defaults to a base address of 0x0000000140000000. Knowing this, we can see that the offset from Notepad’s base to ReplaceSel() is 0x157a8.
It is worth pointing out that the the address of the ReplaceSel() function in the Windbg screenshot ends in eb38 and not 57a8 as you might expect, since we just said its offset is 0x157a8. This is only because IDA is showing the version of notepad.exe from the target system, while Windbg is running my local version of notepad.exe, and there’s no guarantee that functions will be at the same address across different versions of the same application.
Skipping Ahead
After updating the Uninstall() function to write the shellcode to the address of ReplaceSel() (instead of the code cave), then triggering the shellcode in the Replace dialog, I was able to get the MessageBox shellcode to run, and got my message box.
This was a successful proof of concept, but it seemed incomplete until I got a reverse shell. Two more hurdles had to be overcome first.
More Failure
Because the shellcode file is stored on disk, all I had to do was replace the MessageBox shellcode file with a reverse shell shellcode file. I opted to use a custom reverse shell payload instead of one from msfvenom which would almost certainly get caught on disk.
After switching to the reverse shell shellcode file, I was all set to receive my reverse shell, but Notepad crashed instead. From experience, I suspected that the shellcode was too long and was clobbering code beyond the ReplaceSel() function, causing Notepad to crash. For reference, the reverse shell shellcode is about twice as long as the MessageBox shellcode.
Enter Stage 2
At this point I could have tried to find a function besides ReplaceSel() that was long enough to take the entire shellcode without clobbering the function behind it, but it felt easier to just split it into two stages because I liked the way it could be triggered through the Replace dialog. Instead of placing the shellcode in ReplaceSel(), I found another function (CheckSave()) that was long enough to store the entire reverse shell shellcode.
Now, when ReplaceSel() is called, its only job is to calculate the address of CheckSave() and do an unconditional jmp to that address, where the full shellcode would run.
Using IDA, I found the offset of CheckSave() to be 0x3690 from the base address of Notepad, so the custom “stage 1” shellcode was:

Almost There
After updating Uninstall() to use two stages, the final C# code was:

One Last Thing
This time running installutil /u iu.exe caused the dreaded Cortex pop-up. This time, I suspected that Cortex was uncomfortable with the fact that cmd.exe was spawned with a network socket as its stdin and stdout handles.
Fortunately, this was a quick fix because Cortex is likely only performing this check for command interpreters like cmd.exe and powershell.exe which means dbg.exe should slip under the radar.

The reverse shell shellcode was updated to spawn dbg.exe instead of cmd.exe, installutil /u iu.exe was run, and after hitting the Replace button …
Success

If you enjoyed this deep dive or have a technique you want us to explore next, drop us a note - we’re always game for a new challenge.